
How to Use Landscape Inspections
ArborNote’s Landscape Inspection feature helps account managers document property conditions, identify maintenance issues and enhancement opportunities, and generate a professional inspection report.
You can complete the inspection workflow from the field using the ArborNote mobile app, then review and refine the report from the desktop web app.
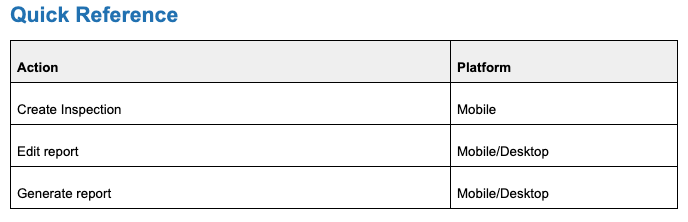
Quick Reference
Video Demo
Desktop Inspection Demo
Watch the Desktop Inspection Demo
Mobile Inspection Demo
Watch the Mobile Inspection Demo
Part 1: Create and Complete an Inspection on Mobile
Step 1: Create an Inspection
Each inspection creates its own independent map and inventory record for that visit. This allows your company to maintain a chronological history of inspections for the property without overwriting previous inspection records.
1. Open the Project
On your ArborNote Landscape device, open the project and go to the Map page.
2. Open the Inspection Page
Tap the note icon to open the Inspection list.
The Inspection list displays previous inspections recorded for the property, if any.
3. Start a New Inspection or Continue an Existing One
To start a new inspection:
- Tap the + icon in the top-right corner.
- Select the inspection type.
- Create and name the inspection.
- Add a note if needed.
For example, you may name the inspection based on the inspection date or inspection type.
If you are continuing an unfinished inspection, select the existing inspection from the list to load its data.
Inspection Mode
Once an inspection loads, the navigation title changes to the inspection's name and a Done button appears in the top-left corner.
This indicates that you are working in Inspection Mode rather than the standard inventory view.
Step 2: Walk the Site and Record Conditions
Inspection Mode uses the same map interface as the standard Landscape Inventory. If you already know how to add markers, areas, and lines, you can use those same tools during an inspection.
1. Locate the Item on the Map
Walk the property and add an observation to the map.
- Drop a marker for an individual item, such as a tree or sprinkler head.
- Draw an area for locations such as lawns or planting beds.
- Draw a line for features such as irrigation runs.
2. Open the Item and Set Its Condition
After adding an item, open its detailed page and select the appropriate condition.
Inspection conditions include:
- Good
- Fair
- Poor
Each condition is assigned its own color. The selected condition color is applied to the corresponding marker, line, or area on the map.
3. Add Supporting Details
Add information to fully document the observation.
- Text notes
- Voice descriptions
- Photos
ArborNote also supports voice input for observation notes. AI can automatically refine the voice transcription, reducing the amount of manual writing and editing required.
4. Save Your Inspection Items
After recording your inspection items, tap the cloud icon in the top-right corner to upload your saved items.
If you are working in Offline Mode, your information is saved locally and queued for upload when a connection becomes available.
Step 3: Review the Inspection Summary
After completing your walkthrough, review the Inspection Summary to see the overall condition of the property.
1. Open the Inspection Summary
While in Inspection Mode, tap the list icon to open the Inspection Summary.
2. Review the Condition Breakdown
The Inspection Summary provides an overview of all inspected markers, areas, and lines grouped by condition:
- Good
- Fair
- Poor
From this screen, you can also:
- Edit the inspection name.
- Edit the inspection type.
- Edit the inspection note.
- Add or edit the inspection summary.
The summary also supports voice input and AI-assisted refinement.
Step 4: Generate the Inspection Report on Mobile
Once the inspection data has been reviewed, you can generate the inspection report directly from the mobile app.
This can be useful when you need to provide the customer with a report while you are still on-site.
1. Generate the Report
From the Inspection Summary screen, tap the Generate Report icon.
ArborNote will compile the inspection information, including the condition summary, site map, and photos captured during the inspection.
2. Review the Report
Review the generated report to confirm that the condition ratings, descriptions, and photos are displayed correctly.
The inspection report includes:
Header
- Property address
- Inspection number
- Inspection date
- Inspector
- Client
- Status
Summary
- Observation count
- Good/Fair/Poor breakdown
- Inspection summary
Site Map
- Visual layout of inspection observations
- Markers
- Areas
- Lines
Observations
- Location
- Observation type
- Condition rating
- Photo count
- Description
Photos
- Photos displayed with their corresponding observations
The completed report can be printed or shared using a link.
Part 2: Review and Edit the Inspection on Desktop
Step 5: Open and Refine the Inspection Report
After completing the inspection, you can open the same inspection from the ArborNote desktop web app.
The report can be edited whether it was already generated on mobile or has not yet been generated.
1. Open the Inspection
From the project, select View Inspection from the Action Menu to open the Inspection list.
From the Inspection list, you can:
- Double-click an inspection to edit it.
- Select the report icon to view the report.
- Select the delete icon to delete an inspection.
2. Edit the Inspection
Double-click the inspection you want to edit.
From the inspection editor, you can:
- Edit the inspection name.
- Edit the inspection note.
- Edit the inspection summary.
- Edit individual inspection items.
- Delete inspection items.
- View inspection photos.
3. Use AI to Refine the Report
ArborNote's AI tools can help with report writing.
AI can assist with:
- Generating the overall inspection summary.
- Drafting descriptions for individual inspection items.
- Refining inspection text.
4. Share or Print the Report
Once the inspection report is complete, you can share it with the customer or an internal supervisor using the report URL.
You can also print the completed inspection report.
Inspection Workflow at a Glance
Create Inspection → Record Conditions → Add Notes & Photos → Review Summary → Generate Report → Edit on Desktop → Share or Print
Comments
0 commentsArticle is closed for comments.